Vue源码解析5-模板解析parse

Vue 源码可以分为 3 大块:双向绑定patch 算法模板解析。其中又以模板解析最为复杂,它是用来将我们写的template模板编译成render函数,可以猜到如果我们直接写render,那么整个解析过程就可以跳过,而且分析其中的代码可以看出这个解析的过程其实是很独立的。

前面的文章也有提到,模板解析主要分为 3 个步骤:

  1. parse,用于将template解析为AST
  2. optimize,用于优化静态内容的渲染,主要是给静态节点打上一些标记
  3. generate,用于根据AST生成render函数

相关的核心代码位于src/compiler/index.js

1
2
3
4
5
6
7
8
9
10
const ast = parse(template.trim(), options);
if (options.optimize !== false) {
optimize(ast, options);
}
const code = generate(ast, options);
return {
ast,
render: code.render,
staticRenderFns: code.staticRenderFns,
};

这篇文章主要说第一步:将template解析为AST,主要思路还是逐步解析template字符串,涉及的代码会比较多。

入口

parse函数定义位于src/compiler/parser/index.js

1
2
3
4
5
6
7
8
9
10
11
12
13
14
15
16
17
18
19
20
21
22
23
24
25
26
27
28
29
30
31
32
33
34
35
36
37
38
39
40
41
42
43
44
45
46
47
48
49
50
51
52
53
54
55
56
57
58
59
60
61
62
/**
* Convert HTML string to AST.
*/
function parse (template: string, options: CompilerOptions): ASTElement | void {
warn = options.warn || baseWarn

// isPreTag、mustUseProp、getTagNamespace定义位于src/platforms/web/compiler/options.js
platformIsPreTag = options.isPreTag || no
platformMustUseProp = options.mustUseProp || no
platformGetTagNamespace = options.getTagNamespace || no

// options.modules见/platforms/web/compiler/modules/index.js,
// 包含[klass,style,model]3个module成员
// pluckModuleFunction:获取每个module中的transformNode成员
transforms = pluckModuleFunction(options.modules, 'transformNode') // klass、style中有定义
preTransforms = pluckModuleFunction(options.modules, 'preTransformNode') // model中有定义
postTransforms = pluckModuleFunction(options.modules, 'postTransformNode') // 没找到

delimiters = options.delimiters

const stack = []
const preserveWhitespace = options.preserveWhitespace !== false
let root
let currentParent
let inVPre = false
let inPre = false
let warned = false

// 用于在解析过程中“关闭”一个节点
function closeElement (element) {
// ...
}

parseHTML(template,
{
warn,
expectHTML: options.expectHTML, // 各种选项,基本都可以从命名来猜到意思
isUnaryTag: options.isUnaryTag, // 是否是单标签
canBeLeftOpenTag: options.canBeLeftOpenTag,
shouldDecodeNewlines: options.shouldDecodeNewlines,
shouldDecodeNewlinesForHref: options.shouldDecodeNewlinesForHref,
shouldKeepComment: options.comments,
// 在解析html过程中处理标签的起始节点
start (tag, attrs, unary) {
// ...
},
// 在解析html过程中处理标签的结束节点
end () {
// ...
},
// 在解析html过程中处理纯文本
chars (text: string) {
// ...
},
// 在解析html过程中处理注释
comment(){
// ...
},
};

return root;
}

可以很容易看出来最核心的是其中的parseHTML函数,其余都是一些影响解析的配置选项。 另外transformspreTransforms会在用到时再细说。

parseHTML

这个函数的总体思路是逐步解析html字符串,将html文本分为了几类,分别处理:

  1. 普通的注释节点
  2. IE 的条件注释 (<![开头)
  3. Doctype
  4. 起始标签
  5. 结束标签
  6. 纯文本
  7. script、style、textarea节点

通过正则表达式判断属于何种类型的节点,具体的表达式长什么样碰到了会说。

函数的大体轮廓:

1
2
3
4
5
6
7
8
9
10
11
12
13
14
15
16
17
18
19
20
21
22
23
24
25
26
27
28
29
30
31
32
33
34
35
36
37
38
39
40
41
42
export function parseHTML(html, options) {
const stack = [];
const expectHTML = options.expectHTML;
const isUnaryTag = options.isUnaryTag || no;
const canBeLeftOpenTag = options.canBeLeftOpenTag || no;
let index = 0;
let last, lastTag;
while (html) {
// 逐步处理html字符串...
}

// Clean up any remaining tags
parseEndTag();

// index递进到指定位置,并截取html
function advance(n) {
index += n;
html = html.substring(n);
}

/**
* 解析起始标签
*/
function parseStartTag() {
// ...
}

// 处理起始标签
function handleStartTag(match) {
// 。。。
}

/**
* 处理结束标签
* @param {String} tagName 标签名,如'a'
* @param {Number} start 标签名在html字符串中的起始位置,如79
* @param {Number} end 标签名在html字符串中的结束位置,如83
*/
function parseEndTag(tagName, start, end) {
// ...
}
}

while (html)

这个循环会针对上面提的每种类型做处理,虽然代码比较多,但除了起始标签和结束标签外的逻辑都很清晰易懂,我也添加了非常详细的注释。

1
2
3
4
5
6
7
8
9
10
11
12
13
14
15
16
17
18
19
20
21
22
23
24
25
26
27
28
29
30
31
32
33
34
35
36
37
38
39
40
41
42
43
44
45
46
47
48
49
50
51
52
53
54
55
56
57
58
59
60
61
62
63
64
65
66
67
68
69
70
71
72
73
74
75
76
77
78
79
80
81
82
83
84
85
86
87
88
89
90
91
92
93
94
95
96
97
98
99
100
101
102
103
104
105
106
107
108
109
110
111
112
113
114
115
116
117
118
119
120
121
122
123
124
125
126
127
128
129
130
131
132
133
134
135
136
while (html) {
last = html;
// Make sure we're not in a plaintext content element like script/style
// isPlainTextElement:判断是否script、style、textarea
// lastTag:最近正在处理的起始标签,在parseStartTag和parseEndTag会被设置
if (!lastTag || !isPlainTextElement(lastTag)) {
let textEnd = html.indexOf('<');

// 如果当前剩余的html是以<开头的,那么很有可能它是注释、条件注释、Doctype、结束标签、开始标签中的一个
// if里面的逻辑就是挨个尝试每一种可能
if (textEnd === 0) {
// Comment注释
if (comment.test(html)) {
const commentEnd = html.indexOf('-->');

if (commentEnd >= 0) {
if (options.shouldKeepComment) {
// 调用parse方法传递的comment选项
options.comment(html.substring(4, commentEnd));
}
advance(commentEnd + 3); // index递进到指定位置,html截取
continue;
}
}

// http://en.wikipedia.org/wiki/Conditional_comment#Downlevel-revealed_conditional_comment
// IE的条件注释 <![开头
if (conditionalComment.test(html)) {
const conditionalEnd = html.indexOf(']>');

if (conditionalEnd >= 0) {
advance(conditionalEnd + 2);
continue;
}
}

// Doctype:
const doctypeMatch = html.match(doctype);
if (doctypeMatch) {
advance(doctypeMatch[0].length);
continue;
}

// End tag结束标签
// 若html为'</a>',则endTagMatch为['</a>','a',groups:undefined,index:0]
const endTagMatch = html.match(endTag);
if (endTagMatch) {
const curIndex = index;
advance(endTagMatch[0].length);
parseEndTag(endTagMatch[1], curIndex, index);
continue;
}

// Start tag其实标签
const startTagMatch = parseStartTag();
if (startTagMatch) {
handleStartTag(startTagMatch);
if (shouldIgnoreFirstNewline(lastTag, html)) {
advance(1);
}
continue;
}
}

let text, rest, next;
/**
* 如果当前剩余的html不是以<开头,那么有可能是纯文本。例如:
* `
* 这里是文本
<a :href="url" target="_blank">前面的文本{{title}}后面的文本</a>
<img :src="img">
</div>
* `
*/
if (textEnd >= 0) {
rest = html.slice(textEnd);
// 如果剩下的以<开头的那段,不是结束标签、开始标签、注释、条件注释,那么它很有可能就是一个孤零零的<字符
// 继续往后递进,直到再也没有<,或者其中一个while条件不满足
while (!endTag.test(rest) && !startTagOpen.test(rest) && !comment.test(rest) && !conditionalComment.test(rest)) {
// < in plain text, be forgiving and treat it as text
next = rest.indexOf('<', 1);
if (next < 0) break; // 如果后面再也没有<,直接跳出while
textEnd += next;
rest = html.slice(textEnd); // 递进到下一段以<开头的文本
}
text = html.substring(0, textEnd); // 截取位于之间的纯文本,如’这里是文本‘
advance(textEnd);
}

// 如果剩下的文本没有<了,那么它们就都是纯文本了
if (textEnd < 0) {
text = html;
html = '';
}

if (options.chars && text) {
options.chars(text); // 调用位于parse中的chars配置
}
} else {
/**
* 如果处理到了script、style、textarea。例如
* 原始html=`<div><script>console.log( 123 )</script></div>`,
* 在此时lastTag = `script`,html剩余`console.log( 123 )</script></div>`
*/
let endTagLength = 0;
const stackedTag = lastTag.toLowerCase();
// 匹配到对应的script/style/textarea闭标签
const reStackedTag = reCache[stackedTag] || (reCache[stackedTag] = new RegExp('([\\s\\S]*?)(</' + stackedTag + '[^>]*>)', 'i'));
const rest = html.replace(reStackedTag, function(all, text, endTag) {
/**
* all = "console.log( 123 )</script>"
* text='console.log( 123 )'
* endTag="</script>"
*/
endTagLength = endTag.length;
if (!isPlainTextElement(stackedTag) && stackedTag !== 'noscript') {
text = text
.replace(/<!\--([\s\S]*?)-->/g, '$1') // #7298
.replace(/<!\[CDATA\[([\s\S]*?)]]>/g, '$1');
}
if (shouldIgnoreFirstNewline(stackedTag, text)) {
text = text.slice(1);
}
if (options.chars) {
options.chars(text);
}
return '';
});
// 此时rest为去除script/style/textarea后剩下的
index += html.length - rest.length;
html = rest;
parseEndTag(stackedTag, index - endTagLength, index); // 处理script/style/textarea结束标签
}

// 一些尾校验略去...
}

可以看到对于注释、Doctype、条件注释,Vue 通常会直接跳过,在处理纯文本和标签时花费了比较多的代码。我们先把一些零碎的细节理一理,主要是几种正则,以及如何处理comment和纯文本chars的。

正则表达式

comment 注释

1
const comment = /^<!\--/; // 匹配 <!--

conditionalComment 条件注释

1
const conditionalComment = /^<!\[/; // 匹配<![

doctype

1
const doctype = /^<!DOCTYPE [^>]+>/i; // 匹配<!DOCTYPE xxx>

endTag 结束标签

1
2
3
const ncname = '[a-zA-Z_][\\w\\-\\.]*'; // 以a-zA-Z_开头,后面连接多个a-zA-Z-.
const qnameCapture = `((?:${ncname}\\:)?${ncname})`; // ncname:ncname, 用于匹配命名空间如 svg:path
const endTag = new RegExp(`^<\\/${qnameCapture}[^>]*>`); // 结束标签

startTagOpen 起始标签

1
2
const startTagOpen = new RegExp(`^<${qnameCapture}`); // 起始标签
const startTagClose = /^\s*(\/?)>/; // 起始标签的结束部分

测试:

1
2
3
4
5
'<svg:path />'.match(startTagOpen); // ["<svg:path", "svg:path", index: 0, input: "<svg:path />"]
'<svg:path.test />'.match(startTagOpen); // ["<svg:path.test", "svg:path.test", index: 0, input: "<svg:path.test />"]

' />'.match(startTagClose); // [" />", "/", index: 0, input: " />"]
' >'.match(startTagClose); // [" >", "", index: 0, input: " >"]

attribute 标签属性

1
const attribute = /^\s*([^\s"'<>\/=]+)(?:\s*(=)\s*(?:"([^"]*)"+|'([^']*)'+|([^\s"'=<>`]+)))?/; // 匹配标签属性,如href="www.baidu.com" 或 href='www.baidu.com'

测试:

1
"href='https://www.baidu.com'".match(attribute); // ["href='https://www.baidu.com'", "href", "=", undefined, "https://www.baidu.com", undefined, index: 0, input: "href='https://www.baidu.com'"]

options.comment

这个是用于处理遇到的 html comment:

1
2
3
4
5
6
7
comment (text: string) {
currentParent.children.push({
type: 3,
text,
isComment: true
})
}

currentParent是当前正在处理标签元素的父元素,后面还说详细说到。

options.chars

处理遇到的纯文本。

1
2
3
4
5
6
7
8
9
10
11
12
13
14
15
16
17
18
19
20
21
22
23
24
25
26
27
28
29
30
31
32
33
34
35
36
37
38
39
40
41
42
43
44
45
46
47
chars (text: string) {
if (!currentParent) {
// 一些警告略去。。。
return
}
// ...IE bug fix 略去

const children = currentParent.children
text =
inPre || text.trim()
? isTextTag(currentParent) // script或style
? text
: decodeHTMLCached(text)
: // only preserve whitespace if its not right after a starting tag
preserveWhitespace && children.length
? ' '
: ''
if (text) {
let res
/**
* 处理文本中的插值表达式,如text=`前面的文本{{title}}后面的文本`,则res为
* {
* expression: ""前面的文本"+_s(title)+"后面的文本"",
* tokens:{
* 0: "前面的文本",
* 1:{
* @binding: "title"
* }
* 2: "后面的文本"
* }
* }
*/
if (!inVPre && text !== ' ' && (res = parseText(text, delimiters))) {
children.push({
type: 2,
expression: res.expression,
tokens: res.tokens,
text
})
} else if (text !== ' ' || !children.length || children[children.length - 1].text !== ' ') {
children.push({
type: 3,
text
})
}
}
},

inVPre我们很少用到,可以当做false处理。这里遇到一个parseText函数,如注释所说是用于处理文本中的插值表达式的。

parseText

1
2
3
4
5
6
7
8
9
10
11
12
13
14
15
16
17
18
19
20
21
22
23
24
25
26
27
28
29
30
31
32
33
34
35
36
37
38
39
40
41
42
43
44
45
46
47
48
49
50
51
52
53
/**
* 处理文本中的插值表达式,如text=`前面的文本{{title}}后面的文本`,则res为
* {
* expression: `"前面的文本"+_s(title)+"后面的文本"`,
* tokens:[
* "前面的文本",
* {
* @binding: "title"
* },
* "后面的文本"
* ]
* }
*/
export function parseText(text: string, delimiters?: [string, string]): TextParseResult | void {
const tagRE = delimiters ? buildRegex(delimiters) : defaultTagRE;
if (!tagRE.test(text)) {
return;
}
const tokens = []; // 主要用于存放text被{{}}切割的分段子文本
const rawTokens = []; // rawTokens和tokens的差别主要在处理插值表达式
let lastIndex = (tagRE.lastIndex = 0); // lastIndex: 每次正则表达式匹配结束后,下一次匹配的起始位置
let match, index, tokenValue;
/**
* text=`前面的文本{{title}}后面的文本`,则match为
* [
* 0: "{{title}}",
1: "title",
groups: undefined,
index: 5,
* ]
*/
while ((match = tagRE.exec(text))) {
index = match.index;
// push text token
if (index > lastIndex) {
rawTokens.push((tokenValue = text.slice(lastIndex, index)));
tokens.push(JSON.stringify(tokenValue));
}
// tag token
const exp = parseFilters(match[1].trim());
tokens.push(`_s(${exp})`);
rawTokens.push({ '@binding': exp });
lastIndex = index + match[0].length;
}
if (lastIndex < text.length) {
rawTokens.push((tokenValue = text.slice(lastIndex)));
tokens.push(JSON.stringify(tokenValue));
}
return {
expression: tokens.join('+'),
tokens: rawTokens,
};
}

tagRE表示如何匹配插值表达式,默认配置/\{\{((?:.|\n)+?)\}\}/g,表示匹配\{\{ xxx \}\}。另外要注意的是插值表达式可以和过滤器一起使用,所以这里也做了处理。

parseFilters

parseFilters将入参看成是 expression+filters的结构,最终返回一个拼接的字符串。

1
2
3
4
5
6
7
8
9
10
11
12
13
14
15
16
17
18
19
20
21
22
23
24
25
26
27
28
29
30
31
32
33
34
35
36
37
38
39
40
41
42
43
44
45
46
47
48
49
50
51
52
53
54
55
56
57
58
59
60
61
62
63
64
65
66
67
68
69
70
71
72
73
74
75
76
77
78
79
80
81
82
83
84
85
86
87
88
89
90
91
92
93
94
95
96
97
98
99
100
101
102
103
104
105
106
107
108
109
110
111
112
113
114
115
116
117
118
119
120
121
122
123
124
125
126
127
128
129
130
const validDivisionCharRE = /[\w).+\-_$\]]/;

// parseFilters将入参看成是 expression+filters结构,
// 最终返回拼接的字符串,如"_f("upper")(title)"
export function parseFilters(exp: string): string {
let inSingle = false;
let inDouble = false;
let inTemplateString = false;
let inRegex = false;
let curly = 0;
let square = 0;
let paren = 0;
let lastFilterIndex = 0; // 最近一次发现过滤器|的位置
let c, prev, i, expression, filters;

for (i = 0; i < exp.length; i++) {
prev = c; // 前一个字符
c = exp.charCodeAt(i); // 当前字符
if (inSingle) {
// 0x27 => ' 0x5c => \
if (c === 0x27 && prev !== 0x5c) inSingle = false;
} else if (inDouble) {
// 0x22 => "
if (c === 0x22 && prev !== 0x5c) inDouble = false;
} else if (inTemplateString) {
// 0x60 => `
if (c === 0x60 && prev !== 0x5c) inTemplateString = false;
} else if (inRegex) {
// 0x2f => /
if (c === 0x2f && prev !== 0x5c) inRegex = false;
} else if (
c === 0x7c && // pipe, 0x7c => |
exp.charCodeAt(i + 1) !== 0x7c &&
exp.charCodeAt(i - 1) !== 0x7c &&
!curly &&
!square &&
!paren
) {
// 如果是遇到的第一个 |
if (expression === undefined) {
// first filter, end of expression
lastFilterIndex = i + 1;
expression = exp.slice(0, i).trim(); // | 前面的表达式
} else {
pushFilter(); // 将前一个filter推入filters栈
}
} else {
// 此前一直是普通文本,在这里判断是不是某些特殊字符,如 (
switch (c) {
case 0x22:
inDouble = true;
break; // "
case 0x27:
inSingle = true;
break; // '
case 0x60:
inTemplateString = true;
break; // `
case 0x28:
paren++;
break; // (
case 0x29:
paren--;
break; // )
case 0x5b:
square++;
break; // [
case 0x5d:
square--;
break; // ]
case 0x7b:
curly++;
break; // {
case 0x7d:
curly--;
break; // }
}
// 0x2f => / , 判断是否当前位于正则表达式当中
if (c === 0x2f) {
let j = i - 1;
let p;
// find first non-whitespace prev char
for (; j >= 0; j--) {
p = exp.charAt(j);
if (p !== ' ') break;
}
if (!p || !validDivisionCharRE.test(p)) {
inRegex = true;
}
}
}
}

if (expression === undefined) {
// 如果始终没有|,那么整个入参都当做expression。
expression = exp.slice(0, i).trim();
} else if (lastFilterIndex !== 0) {
// 如果之前在某个位置遇到了一个|,那么从那里到exp末尾都是这个filter
pushFilter();
}

function pushFilter() {
(filters || (filters = [])).push(exp.slice(lastFilterIndex, i).trim());
lastFilterIndex = i + 1;
}
// exp = "title|upper(123,456)|sense" => filters = ["upper(123,456)","sense"]
// for循环后,expression = "_f("sense")(_f("upper")(title,123,456))"
if (filters) {
for (i = 0; i < filters.length; i++) {
// wrapFilter('title', 'upper') => "_f("upper")(title)"
// wrapFilter('title', 'upper(123,456)') => "_f("upper")(title,123,456)"
expression = wrapFilter(expression, filters[i]);
}
}

return expression;
}

function wrapFilter(exp: string, filter: string): string {
// filter的形式可以是 exp| filter,或者exp| filterName(filterArg)
const i = filter.indexOf('(');
if (i < 0) {
// _f: resolveFilter
return `_f("${filter}")(${exp})`;
} else {
const name = filter.slice(0, i);
const args = filter.slice(i + 1);
return `_f("${name}")(${exp}${args !== ')' ? ',' + args : args}`;
}
}

这个函数会将参数字符串按字符挨个处理,因为插值表达式的形式很多样,代码注释里有给出一些例子可以看看。

起始标签

在说完while(html)循环中的一些边界处理后,剩下的就是两个重头戏开始标签和结束标签了。

parseHTML对这俩的处理有点类似括号匹配的做法,每当遇到起始标签时就把它放到一个堆栈里。在遇到一个结束标签时,通常此时的栈顶就是对应的起始标签。整个 html 的处理过程就随着入栈出栈的操作不断进行。等到处理完 html 之后,如果没错这个堆栈正好也会变成空的。

while(html)循环中处理起始标签的代码很少,就是调用了 2 个函数:

1
2
3
4
5
6
7
8
9
// Start tag起始标签,如<p>
const startTagMatch = parseStartTag()
if (startTagMatch) {
handleStartTag(startTagMatch)
if (shouldIgnoreFirstNewline(lastTag, html)) {
advance(1)
}
continue
}

parseStartTag

解析起始标签,同时处理标签上的属性。

1
2
3
4
5
6
7
8
9
10
11
12
13
14
15
16
17
18
19
20
21
22
23
24
25
26
27
28
function parseStartTag() {
// `<div id="app">`.match(startTagOpen) =>
// ['<div','div']
const start = html.match(startTagOpen);
if (start) {
const match = {
tagName: start[1],
attrs: [],
start: index,
};
advance(start[0].length);
let end, attr;
// 如果不是以结束标签开头,并且有html属性。
// `id="app">`.match(attribute) =>
// ['id="app"','id','=','app']
while (!(end = html.match(startTagClose)) && (attr = html.match(attribute))) {
advance(attr[0].length);
match.attrs.push(attr);
}
// ['>','']
if (end) {
match.unarySlash = end[1];
advance(end[0].length);
match.end = index;
return match;
}
}
}

比如此时的html

1
<div id="app">xxxxxx</div>

则返回结果为:

1
2
3
4
5
6
7
8
9
{
tagName: 'div',
attrs: [
['id="app"','id','=','app',undefined,undefined]
],
start: 0,
end: 14,
unarySlash: ""
}

handleStartTag

主要是继续处理parseStartTag返回值的attrs属性,并最终调用parse中传入的start选项。

1
2
3
4
5
6
7
8
9
10
11
12
13
14
15
16
17
18
19
20
21
22
23
24
25
26
27
28
29
30
31
32
33
34
35
36
37
38
39
40
41
42
43
44
45
46
47
48
49
50
51
52
53
54
55
56
57
58
59
60
61
62
63
64
65
66
// match的格式就是上面的parseStartTag返回值
function handleStartTag(match) {
const tagName = match.tagName;
const unarySlash = match.unarySlash;

if (expectHTML) {
if (lastTag === 'p' && isNonPhrasingTag(tagName)) {
parseEndTag(lastTag);
}
if (canBeLeftOpenTag(tagName) && lastTag === tagName) {
parseEndTag(tagName);
}
}
// isUnaryTag是否为单标签元素,如<img>,所有单标签元素:
// 'area,base,br,col,embed,frame,hr,img,input,isindex,keygen'
// 'link,meta,param,source,track,wbr'
const unary = isUnaryTag(tagName) || !!unarySlash;

const l = match.attrs.length;
const attrs = new Array(l);
for (let i = 0; i < l; i++) {
const args = match.attrs[i];
// hackish work around FF bug https://bugzilla.mozilla.org/show_bug.cgi?id=369778
if (IS_REGEX_CAPTURING_BROKEN && args[0].indexOf('""') === -1) {
if (args[3] === '') {
delete args[3];
}
if (args[4] === '') {
delete args[4];
}
if (args[5] === '') {
delete args[5];
}
}
// args格式: ['id="app"','id','=','app',undefined,undefined]
const value = args[3] || args[4] || args[5] || '';
const shouldDecodeNewlines = tagName === 'a' && args[1] === 'href' ? options.shouldDecodeNewlinesForHref : options.shouldDecodeNewlines;
// attrs格式 : {name:string, value:string}[]
// 如 [{name:'id',value:'app'}]
attrs[i] = {
name: args[1],
value: decodeAttr(value, shouldDecodeNewlines),
};
}

// 如果不是单标签元素,那么先把这个其实标签记到标签堆栈当中,当遇到对应的结束标签时再出栈.
/**
* stack格式示范:
* [
* {
* tag: 'div',
* lowerCasedTag: 'div',
* attrs: [ {name:'id',value:'app'} ]
* }
* ]
*/
if (!unary) {
stack.push({ tag: tagName, lowerCasedTag: tagName.toLowerCase(), attrs: attrs });
lastTag = tagName; // 标记当前正处理到哪个标签
}

if (options.start) {
// 调用parse函数中的start选项
options.start(tagName, attrs, unary, match.start, match.end);
}
}

options.start

这里的逻辑很多,核心逻辑是解析节点上的各种静态、动态绑定。在这里我们会生成 AST 节点。

1
2
3
4
5
6
7
8
9
10
11
12
13
14
15
16
17
18
19
20
21
22
23
24
25
26
27
28
29
30
31
32
33
34
35
36
37
38
39
40
41
42
43
44
45
46
47
48
49
50
51
52
53
54
55
56
57
58
59
60
61
62
63
64
65
66
67
68
69
70
71
72
73
74
75
76
77
78
79
80
81
82
83
84
85
86
87
88
89
90
91
92
93
94
95
96
97
98
99
100
101
102
103
104
105
106
// 参数示范
// tag: 'div'; 当前处理的起始标签
// attrs: [ {name:'id',value:'app'} ] 起始标签上的属性
// unary: false。 是否单标签元素
start (tag, attrs, unary) {
/**
* element格式示范:
*
* {
"type": 1,
"tag": "div",
"attrsList": [
{
"name": "id",
"value": "app"
}
],
"attrsMap": {
"id": "app"
},
"children": [],
parent: undefined
* }
*/
let element: ASTElement = createASTElement(tag, attrs, currentParent)


// apply pre-transforms。 例如v-model的预处理
for (let i = 0; i < preTransforms.length; i++) {
/**
* 目前只在model这个module中有定义,
* 见src/platforms/web/compiler/modules/model.js,是专门用来预处理<input v-model="xxx" type="xxx"> 的。
*
* Expand input[v-model] with dyanmic type bindings into v-if-else chains
* Turn this:
* <input v-model="data[type]" :type="type">
* into this:
* <input v-if="type === 'checkbox'" type="checkbox" v-model="data[type]">
* <input v-else-if="type === 'radio'" type="radio" v-model="data[type]">
* <input v-else :type="type" v-model="data[type]">
*/
element = preTransforms[i](element, options) || element
}

// 处理v-pre指令, 如<span v-pre>{{ this will not be compiled }}</span>
// 若有,则element.pre=true
if (!inVPre) {
processPre(element)
if (element.pre) {
inVPre = true
}
}
if (platformIsPreTag(element.tag)) {
inPre = true
}
if (inVPre) {
processRawAttrs(element)
} else if (!element.processed) {
// structural directives
processFor(element) // 处理节点上的v-for属性
processIf(element) // 处理节点上的v-if属性
// v-once只渲染元素和组件一次。随后的重新渲染,元素/组件及其所有的子节点将被视为静态内容并跳过。这可以用于优化更新性能。
processOnce(element) // 处理节点上的v-once属性
// element-scope stuff
processElement(element, options) // 处理ref、slot、is、指令以及其他所有普通属性
}

// tree management
if (!root) {
root = element
checkRootConstraints(root) // 不能用slot和template当做root节点,同时root节点上不能有v-for
} else if (!stack.length) {
// allow root elements with v-if, v-else-if and v-else
// 组件的根节点并不只是限制一个节点,而是可以由一组v-if, v-else-if and v-else节点
if (root.if && (element.elseif || element.else)) {
checkRootConstraints(element)
addIfCondition(root, {
exp: element.elseif,
block: element
})
}
}
if (currentParent && !element.forbidden) {
// 在处理到v-else-if and v-else节点时,需要将其和v-if节点结合起来,
// 通过在v-if节点上的ifConditions数组,来最终决定渲染哪个节点
if (element.elseif || element.else) {
processIfConditions(element, currentParent)
} else if (element.slotScope) {
// scoped slot,见processElement -> processSlot
currentParent.plain = false
const name = element.slotTarget || '"default"'
;(currentParent.scopedSlots || (currentParent.scopedSlots = {}))[name] = element
} else {
currentParent.children.push(element)
element.parent = currentParent
}
}
// 如果当前处理的元素不是单标签元素,那么随后处理的element的父节点应该都是当前元素,
// 直到处理到一个结束标签时,才会尝试再次修改currentParent
if (!unary) {
currentParent = element
stack.push(element) // 保存所有处理到的标签路径,联想一下括号匹配
} else {
closeElement(element) // 单标签元素可以直接“关闭”当前元素,开启全新的下一轮
}
}

AST 节点

createASTElement用来创建一个 AST 节点,看看长什么样:

1
2
3
4
5
6
7
8
9
10
function createASTElement(tag: string, attrs: Array<Attr>, parent: ASTElement | void): ASTElement {
return {
type: 1,
tag,
attrsList: attrs,
attrsMap: makeAttrsMap(attrs),
parent,
children: [],
};
}

很简单的几个属性,意义也很容易猜出来。不过parse的过程中可能一些 AST 节点上会添加各种其他属性。

preTransforms

目前只有针对v-model的处理,这块逻辑有点多,不过代码比较简单,看注释即可。

1
2
3
4
5
6
7
8
9
10
11
12
13
14
15
16
17
18
19
20
21
22
23
24
25
26
27
28
29
30
31
32
33
34
35
36
37
38
39
40
41
42
43
44
45
46
47
48
49
50
51
52
53
54
55
56
57
58
59
60
61
62
63
64
65
66
67
68
69
70
71
72
73
74
75
76
77
78
79
80
81
82
function preTransformNode(el: ASTElement, options: CompilerOptions) {
if (el.tag === 'input') {
const map = el.attrsMap;
if (!map['v-model']) {
return;
}

let typeBinding;
// 获取动态绑定的type属性
if (map[':type'] || map['v-bind:type']) {
typeBinding = getBindingAttr(el, 'type');
}
if (!map.type && !typeBinding && map['v-bind']) {
typeBinding = `(${map['v-bind']}).type`;
}

if (typeBinding) {
const ifCondition = getAndRemoveAttr(el, 'v-if', true);
const ifConditionExtra = ifCondition ? `&&(${ifCondition})` : ``;
const hasElse = getAndRemoveAttr(el, 'v-else', true) != null;
const elseIfCondition = getAndRemoveAttr(el, 'v-else-if', true);
// 1. checkbox
const branch0 = cloneASTElement(el);
// process for on the main node
processFor(branch0);
addRawAttr(branch0, 'type', 'checkbox');
processElement(branch0, options);
branch0.processed = true; // prevent it from double-processed
branch0.if = `(${typeBinding})==='checkbox'` + ifConditionExtra;
// 若el对应的节点为:<input :type="'checkbox'" v-model="msg">
// 则 typeBinding="checkbox"; ifConditionExtra=“”,addIfCondition之后在el上增加的相关属性有
/**
* {
* if: "('checkbox')==='checkbox'",
* attrsList: [
* // ...
* {
* name: "type",
value: "checkbox"
* }
* ],
* ifConditions:[
* {
* block: branch0,
* exp: "('checkbox')==='checkbox'",
* }
* ]
* }
*/
addIfCondition(branch0, {
exp: branch0.if,
block: branch0,
});
// 2. add radio else-if condition
const branch1 = cloneASTElement(el);
getAndRemoveAttr(branch1, 'v-for', true);
addRawAttr(branch1, 'type', 'radio');
processElement(branch1, options);
addIfCondition(branch0, {
exp: `(${typeBinding})==='radio'` + ifConditionExtra,
block: branch1,
});
// 3. other
const branch2 = cloneASTElement(el);
getAndRemoveAttr(branch2, 'v-for', true);
addRawAttr(branch2, ':type', typeBinding);
processElement(branch2, options);
addIfCondition(branch0, {
exp: ifCondition,
block: branch2,
});

if (hasElse) {
branch0.else = true;
} else if (elseIfCondition) {
branch0.elseif = elseIfCondition;
}

return branch0;
}
}
}

processPre

处理v-pre指令, 如<span v-pre>\{\{ this will not be compiled \}\}</span>, 若节点上有v-pre,则el.pre=true.

1
2
3
4
5
function processPre(el) {
if (getAndRemoveAttr(el, 'v-pre') != null) {
el.pre = true;
}
}

processRawAttrs

处理 AST 节点上的attrsList属性,将他们复制到attrs上去。

1
2
3
4
5
6
7
8
9
10
11
12
13
14
15
function processRawAttrs(el) {
const l = el.attrsList.length;
if (l) {
const attrs = (el.attrs = new Array(l));
for (let i = 0; i < l; i++) {
attrs[i] = {
name: el.attrsList[i].name,
value: JSON.stringify(el.attrsList[i].value),
};
}
} else if (!el.pre) {
// non root node in pre blocks with no attributes
el.plain = true;
}
}

processFor

处理v-for,例如处理的起始标签为<div v-for="(value,key,index) in items">,那么此时传入的el

1
2
3
4
5
6
7
8
9
10
{
attrsList:[],
attrsMap: {
v-for: "(value,key,index) in items"
},
children: [],
tag: "div",
type: 1,
parent: ...
}
1
2
3
4
5
6
7
8
9
10
11
12
13
function processFor(el: ASTElement) {
let exp;
// getAndRemoveAttr:
// 从attrsMap中获取key为‘v-for’的属性值,例如 "(value,key,index) in items"
if ((exp = getAndRemoveAttr(el, 'v-for'))) {
const res = parseFor(exp);
if (res) {
extend(el, res);
} else if (process.env.NODE_ENV !== 'production') {
warn(`Invalid v-for expression: ${exp}`);
}
}
}

parseFor来拆解v-for表达式:

1
2
3
4
5
6
7
8
9
10
11
12
13
14
15
16
17
18
19
20
21
22
23
24
25
26
27
28
29
30
31
32
33
34
35
export function parseFor(exp: string): ?ForParseResult {
// 若exp为(value,key,index), inMatch为
/**
* [
* "(value,key,index) in items",
"(value,key,index)",
"items"
* ]
*/
const inMatch = exp.match(forAliasRE);
if (!inMatch) return;
const res = {};
res.for = inMatch[2].trim();
// 去掉两边括号,结果为‘value,key,index’
const alias = inMatch[1].trim().replace(stripParensRE, '');
/**
* iteratorMatch示范
* [
* ",key,index",
"key",
"index"
* ]
*/
const iteratorMatch = alias.match(forIteratorRE);
if (iteratorMatch) {
res.alias = alias.replace(forIteratorRE, ''); // 'value'
res.iterator1 = iteratorMatch[1].trim(); // 'key'
if (iteratorMatch[2]) {
res.iterator2 = iteratorMatch[2].trim(); // 'index'
}
} else {
res.alias = alias; // ‘value,key,index’
}
return res;
}

v-for属性值为‘(value,key,index) in items’,parseFor处理后在ast上添加的属性有:

1
2
3
4
5
6
{
for: 'items',
alias: 'value',
iterator1: 'key'
iterator2: 'index'
}

processIf

对于v-if, v-else-if和 v-else,实际上在不同阶段都有对应处理,主要是因为它可以有多个分支,最终渲染哪个分支需要根据绑定的值来决定,所以比较复杂。

1. processIf

处理节点上的 v-if 属性。

1
2
3
4
5
6
7
8
9
10
11
12
13
14
15
16
17
18
19
function processIf(el) {
const exp = getAndRemoveAttr(el, 'v-if');
if (exp) {
el.if = exp; // 'condition'
// 往el.ifConditions数组添加{exp,block}
addIfCondition(el, {
exp: exp,
block: el,
});
} else {
if (getAndRemoveAttr(el, 'v-else') != null) {
el.else = true;
}
const elseif = getAndRemoveAttr(el, 'v-else-if');
if (elseif) {
el.elseif = elseif; // "condition2"
}
}
}

若 html 为

1
2
3
<div v-if="condition">this is v-if</div>
<div v-else-if="condition2">this is v-else-if</div>
<div v-else>this is v-else</div>

processIf会调用 3 次,每次的差别在于attrsMap里的属性值

1
2
3
4
5
6
7
8
9
{
attrsList:[],
attrsMap: {
'v-if': 'condition'
// 或者 'v-else-if': "condition2"
// 或者 'v-else': ""
},
tag: 'div',
}

2. 在处理到v-else-if and v-else节点时, 需要将其和 v-if 节点结合起来:

1
2
3
4
5
6
7
if (currentParent && !element.forbidden) {
// 通过在v-if节点上的ifConditions数组,来最终决定渲染哪个节点
if (element.elseif || element.else) {
processIfConditions(element, currentParent);
}
// ...
}

processIfConditions用于将v-else-if或v-else上绑定的表达式都统一放到v-if节点上的ifConditions数组数组中。

1
2
3
4
5
6
7
8
9
10
11
12
13
14
15
16
17
18
19
20
21
22
23
24
25
26
27
function processIfConditions(el, parent) {
const prev = findPrevElement(parent.children); // 找到v-else-if或v-else前面的v-if节点
if (prev && prev.if) {
// 添加prev.ifConditions数组元素
addIfCondition(prev, {
exp: el.elseif,
block: el,
});
} else if (process.env.NODE_ENV !== 'production') {
warn(`v-${el.elseif ? 'else-if="' + el.elseif + '"' : 'else'} ` + `used on element <${el.tag}> without corresponding v-if.`);
}
}

// 找到children中第一个element节点
function findPrevElement(children: Array<any>): ASTElement | void {
let i = children.length;
while (i--) {
if (children[i].type === 1) {
return children[i];
} else {
if (process.env.NODE_ENV !== 'production' && children[i].text !== ' ') {
warn(`text "${children[i].text.trim()}" between v-if and v-else(-if) ` + `will be ignored.`);
}
children.pop();
}
}
}

最终会在v-if标签节点对应ASTifConditions数组中存放了所有的可能分支,这个数组的格式为

1
2
3
4
{
exp: string,
block: ASTElement
}[]

render时会找到 exp 成立的那个元素,渲染对应的block

processOnce

处理v-once,这个指令只渲染元素和组件一次。随后的重新渲染,元素/组件及其所有的子节点将被视为静态内容并跳过。这可以用于优化更新性能。

1
2
3
4
5
6
function processOnce(el) {
const once = getAndRemoveAttr(el, 'v-once');
if (once != null) {
el.once = true;
}
}

processElement

处理refslotis指令以及其他所有普通属性.

1
2
3
4
5
6
7
8
9
10
11
12
13
14
15
16
17
18
19
20
21
22
23
24
25
26
27
28
export function processElement(element: ASTElement, options: CompilerOptions) {
processKey(element); // 处理静态或动态key属性

// determine whether this is a plain element after
// removing structural attributes
// 纯元素:没有key属性以及其他任何属性
element.plain = !element.key && !element.attrsList.length;

processRef(element); // 处理静态或动态ref属性
processSlot(element); // 处理slot,获取slotTarget和slotScope属性
processComponent(element); // 处理is属性,将对应值设置到component属性上
// 处理class、style module的transformNode
for (let i = 0; i < transforms.length; i++) {
/**
* transforms目前只在class和style的module中有定义,逻辑类似
* 见src/platforms/web/compiler/modules文件夹。
* 其中
* 1. class的transforms作用:
* a. 获取静态绑定的class属性,放到el.staticClass
* b. 获取动态绑定的class属性,放到el.classBinding
* 2. style的transforms作用:
* a. 获取静态绑定的style属性,放到el.staticStyle
* b. 获取动态绑定的style属性,放到el.styleBinding
*/
element = transforms[i](element, options) || element;
}
processAttrs(element); // 处理element上的所有属性,根据属性名分为指令和普通属性
}

内部调用了多个其他函数,挨个来说是做什么的。

processKey

获取静态或动态绑定的key属性.

1
2
3
4
5
6
7
8
9
10
11
12
13
14
15
16
17
18
19
20
function processKey(el) {
// 获取动态绑定的key属性
const exp = getBindingAttr(el, 'key');
if (exp) {
// ...
el.key = exp;
}
}

export function getBindingAttr(el: ASTElement, name: string, getStatic?: boolean): ?string {
const dynamicValue = getAndRemoveAttr(el, ':' + name) || getAndRemoveAttr(el, 'v-bind:' + name);
if (dynamicValue != null) {
return parseFilters(dynamicValue);
} else if (getStatic !== false) {
const staticValue = getAndRemoveAttr(el, name);
if (staticValue != null) {
return JSON.stringify(staticValue);
}
}
}

processRef

获取动态绑定的ref属性,并检查是否位于v-for当中。

1
2
3
4
5
6
7
8
9
10
11
12
13
14
15
16
17
18
19
function processRef(el) {
const ref = getBindingAttr(el, 'ref');
if (ref) {
el.ref = ref;
el.refInFor = checkInFor(el);
}
}

// 并检查是否位于`v-for`当中
function checkInFor(el: ASTElement): boolean {
let parent = el;
while (parent) {
if (parent.for !== undefined) {
return true;
}
parent = parent.parent;
}
return false;
}

processSlot

处理slot插槽, 插槽有 3 种形式:

  1. 定义插槽: <slot name='xxx'><slot>
  2. 作用域插槽: <template slot-scope="slotScope"></template>. 在定义插槽时绑定在slot元素上的值会传递给slotScope
  3. 使用插槽: <p slot="xxx"></p>

1. 处理插槽和作用域插槽,获取 slotName、slotScope、slotTarget

1
2
3
4
5
6
7
8
9
10
11
12
13
14
15
16
17
18
19
20
21
22
23
24
25
26
27
28
function processSlot(el) {
// <slot name='xxx'>
if (el.tag === 'slot') {
el.slotName = getBindingAttr(el, 'name');
} else {
let slotScope;
// 整个if/else-if分支用于获取作用域插槽的绑定值slotScope
if (el.tag === 'template') {
// <template scope="xxx">
slotScope = getAndRemoveAttr(el, 'scope');
// <template slot-scope="xxx">
el.slotScope = slotScope || getAndRemoveAttr(el, 'slot-scope');
} else if ((slotScope = getAndRemoveAttr(el, 'slot-scope'))) {
// 普通元素上的作用域插槽,如 <p slot-scope="xxx">123</p>
el.slotScope = slotScope;
}
// <p slot="xxx"></p>
const slotTarget = getBindingAttr(el, 'slot');
if (slotTarget) {
el.slotTarget = slotTarget === '""' ? '"default"' : slotTarget;
// preserve slot as an attribute for native shadow DOM compat
// only for non-scoped slots.
if (el.tag !== 'template' && !el.slotScope) {
addAttr(el, 'slot', slotTarget);
}
}
}
}

2. 生成 scopedSlots 映射

1
2
3
4
5
6
7
8
9
if (currentParent && !element.forbidden) {
// ...
else if (element.slotScope) {
// scoped slot,见processElement -> processSlot
currentParent.plain = false
const name = element.slotTarget || '"default"'
;(currentParent.scopedSlots || (currentParent.scopedSlots = {}))[name] = element
}
}

processComponent

处理is属性,将对应值设置到component属性上.

1
2
3
4
5
6
7
8
9
function processComponent(el) {
let binding;
if ((binding = getBindingAttr(el, 'is'))) {
el.component = binding;
}
if (getAndRemoveAttr(el, 'inline-template') != null) {
el.inlineTemplate = true;
}
}

transforms

v-modelpreTransform是在processElement之前执行,而classstyle的处理是在processElement之内处理的,而且处理方法很类似。

transforms目前只在classstylemodule中有定义,见src/platforms/web/compiler/modules文件夹。
其中

  1. classtransforms作用:
    1. 获取静态绑定的class属性,放到el.staticClass
    2. 获取动态绑定的class属性,放到el.classBinding
  2. styletransforms作用:
    1. 获取静态绑定的style属性,放到el.staticStyle
    2. 获取动态绑定的style属性,放到el.styleBinding

这里只展示class的源码:

1
2
3
4
5
6
7
8
9
10
11
12
13
14
function transformNode(el: ASTElement, options: CompilerOptions) {
const warn = options.warn || baseWarn;
const staticClass = getAndRemoveAttr(el, 'class');

// warning略去...

if (staticClass) {
el.staticClass = JSON.stringify(staticClass);
}
const classBinding = getBindingAttr(el, 'class', false /* getStatic */);
if (classBinding) {
el.classBinding = classBinding;
}
}

processAttrs

处理element上的所有属性,根据属性名分为指令和普通属性,v-on的处理也会在这里。

对于动态绑定属性的处理会比较复杂,静态绑定很简单。

1
2
3
4
5
6
7
8
9
10
11
12
13
14
15
16
17
18
19
20
21
22
23
24
25
function processAttrs(el) {
// attrsList结构示范:[{name:'id',value:'app'}]
const list = el.attrsList;
let i, l, name, rawName, value, modifiers, isProp;
for (i = 0, l = list.length; i < l; i++) {
name = rawName = list[i].name;
value = list[i].value;
// v- 或 @ 或 : 开头的属性名
if (dirRE.test(name)) {
// 处理动态绑定...
} else {
// literal attribute, 非动态绑定的普通属性

// warning略去

// 往el.attrs上添加元素,attrs的结构与attrsList相同
addAttr(el, name, JSON.stringify(value));
// #6887 firefox doesn't update muted state if set via attribute
// even immediately after element creation
if (!el.component && name === 'muted' && platformMustUseProp(el.tag, el.attrsMap.type, name)) {
addProp(el, name, 'true');
}
}
}
}

上面的if (dirRE.test(name))分支就是用来处理动态绑定的属性,是匹配v-@: 开头的属性名. 相比之下静态属性就是简单的调用addAttr放到el.attrs即可。

动态绑定属性的分支代码:

1
2
3
4
5
6
7
8
9
10
11
12
13
14
15
16
17
18
19
20
21
22
23
24
25
26
27
28
29
30
31
32
33
34
35
36
37
38
39
40
41
42
43
44
45
46
47
48
49
50
51
52
53
54
55
56
57
58
59
60
61
62
63
64
65
66
67
68
69
70
// mark element as dynamic
el.hasBindings = true;
// modifiers修饰符, 即.xxx,若存在则返回一个对象, {m1: true, m2:true}
modifiers = parseModifiers(name);
if (modifiers) {
name = name.replace(modifierRE, ''); // 去除修饰符
}
if (bindRE.test(name)) {
// v-bind,: 或 v-bind: 开头的属性绑定
name = name.replace(bindRE, ''); // 去掉: 或 v-bind:
value = parseFilters(value); // 解析可能的过滤器,若存在则返回的value是一个字符串
isProp = false;
if (modifiers) {
// 见v-bind api: https://cn.vuejs.org/v2/api/#v-bind
// .prop修饰符:被用于绑定 DOM 属性 (property)
if (modifiers.prop) {
isProp = true;
name = camelize(name);
if (name === 'innerHtml') name = 'innerHTML'; // innerHtml.prop
}
// .camel - (2.1.0+) 将 kebab-case 特性名转换为 camelCase
if (modifiers.camel) {
name = camelize(name);
}
// .sync (2.3.0+) 语法糖,会扩展成一个更新父组件绑定值的 v-on 侦听器。
if (modifiers.sync) {
addHandler(el, `update:${camelize(name)}`, genAssignmentCode(value, `$event`)); // 添加事件监听
}
}
if (isProp || (!el.component && platformMustUseProp(el.tag, el.attrsMap.type, name))) {
addProp(el, name, value);
} else {
// attrs只存在动态绑定的属性,如[{name: "href",value: 'xxx'}]
// attrsList存在的是大杂烩,存在所有动态/静态属性
// [{name: ":href",value: 'xxx'},
// {name: "target", value: "_blank"},
// {name: "@click.native", value: "log"}]
addAttr(el, name, value); // 将去除修饰符之后的属性添加到el.attrs数组
}
} else if (onRE.test(name)) {
// v-on,事件绑定
name = name.replace(onRE, '');
// 添加事件监听,处理el.nativeEvents或el.events对象,他们的格式为
/**
* {
* [eventName]: handler | handler[],
* },
* handler格式
* {
* value: string,
* modifiers: { [name: string]: true }
* }
*/
addHandler(el, name, value, modifiers, false, warn);
} else {
// normal directives,普通指令, v-xxx
name = name.replace(dirRE, '');
// parse arg,解析指令参数
const argMatch = name.match(argRE);
const arg = argMatch && argMatch[1];
if (arg) {
name = name.slice(0, -(arg.length + 1));
}
// 添加el.directives数组元素
// el.directives.push({ name, rawName, value, arg, modifiers })
addDirective(el, name, rawName, value, arg, modifiers);
if (process.env.NODE_ENV !== 'production' && name === 'model') {
checkForAliasModel(el, value);
}
}

v-bind的修饰符有 3 种,propcamelsync,官网上的解释很清楚,可以自己去看下。

其他注释已经很清楚了,需要再看看的是其中调用的一些帮助函数,挨个说下。

parseModifiers

获取绑定的修饰符,注意不仅仅是`@event.m1.m2可以加修饰符,:prop.m1.m2`也是可以加的哦~

1
2
3
4
5
6
7
8
9
10
function parseModifiers(name: string): Object | void {
const match = name.match(modifierRE); // /\.[^.]+/g // .xxx
if (match) {
const ret = {};
match.forEach(m => {
ret[m.slice(1)] = true;
});
return ret;
}
}

若存在修饰符则返回一个对象,类似{m1: true, m2:true}.

addHandler

添加事件监听,处理el.nativeEventsel.events对象.

1
2
3
4
5
6
7
8
9
10
11
12
13
14
15
16
17
18
19
20
21
22
23
24
25
26
27
28
29
30
31
32
33
34
35
36
37
38
39
40
41
42
43
44
45
46
47
48
49
50
51
52
53
54
55
56
57
58
59
60
61
62
export function addHandler(el: ASTElement, name: string, value: string, modifiers: ?ASTModifiers, important?: boolean, warn?: Function) {
// modifiers事件修饰符对象,如{ native: true }
modifiers = modifiers || emptyObject;

// check capture modifier
if (modifiers.capture) {
delete modifiers.capture;
name = '!' + name; // mark the event as captured
}
if (modifiers.once) {
delete modifiers.once;
name = '~' + name; // mark the event as once
}
/* istanbul ignore if */
if (modifiers.passive) {
delete modifiers.passive;
name = '&' + name; // mark the event as passive
}

// normalize click.right and click.middle since they don't actually fire
// this is technically browser-specific, but at least for now browsers are
// the only target envs that have right/middle clicks.
if (name === 'click') {
if (modifiers.right) {
name = 'contextmenu'; // 将click.right修改为contextmenu事件
delete modifiers.right;
} else if (modifiers.middle) {
name = 'mouseup'; // 将click.middle修改为mouseup事件
}
}

let events; // 容纳所有事件处理器的包装对象
if (modifiers.native) {
delete modifiers.native;
events = el.nativeEvents || (el.nativeEvents = {});
} else {
events = el.events || (el.events = {});
}

const newHandler: any = {
value: value.trim(),
};
// 除了上述列举的修饰符,还有其他修饰符
if (modifiers !== emptyObject) {
newHandler.modifiers = modifiers;
}

const handlers = events[name];
/* istanbul ignore if */
if (Array.isArray(handlers)) {
// 在el上已有多个对此事件的处理器,将所有处理器放到一个数组里
important ? handlers.unshift(newHandler) : handlers.push(newHandler);
} else if (handlers) {
// 在el上已有1个对此事件的处理器
events[name] = important ? [newHandler, handlers] : [handlers, newHandler];
} else {
// 在el上还没有对此事件的处理器
events[name] = newHandler;
}

el.plain = false;
}

最终el.nativeEventsel.events对象,他们的格式为

1
2
3
 {
[eventName]: handler | handler[],
}

handler 格式

1
2
3
4
{
value: string,
modifiers: { [name: string]: true }
}

针对不同的内置修饰符,eventName的格式有所不同,如name.once会变成 ~name.

实验

可以看到整个流程涉及的东西非常多,很容易蒙圈。最好的办法就是写一个小 demo,然后逐步打断点看看每一步的结果。例如:
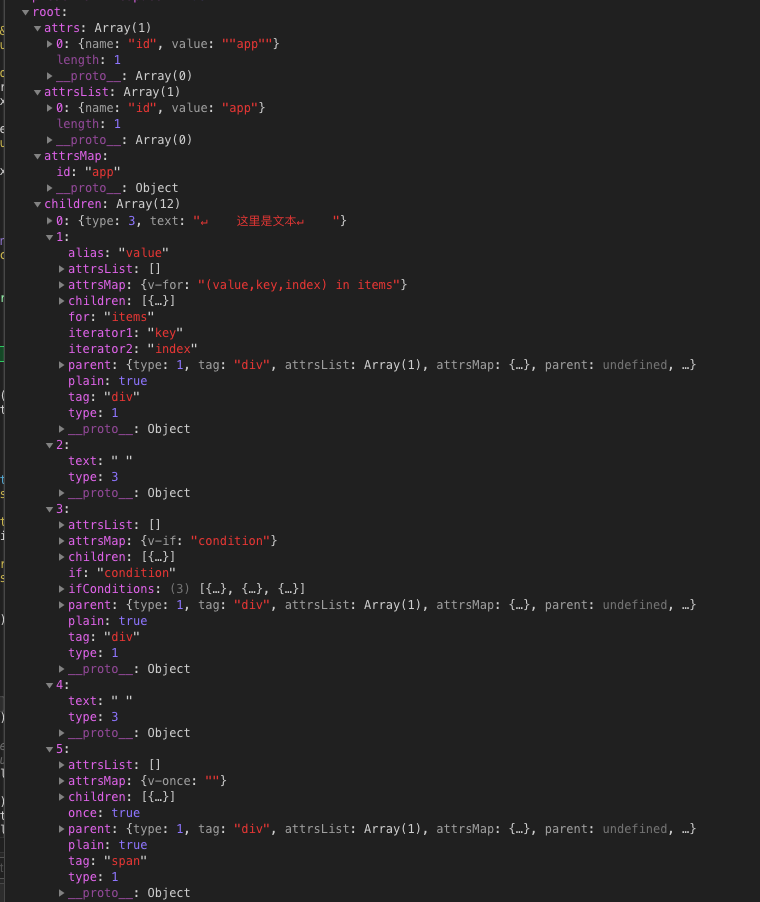
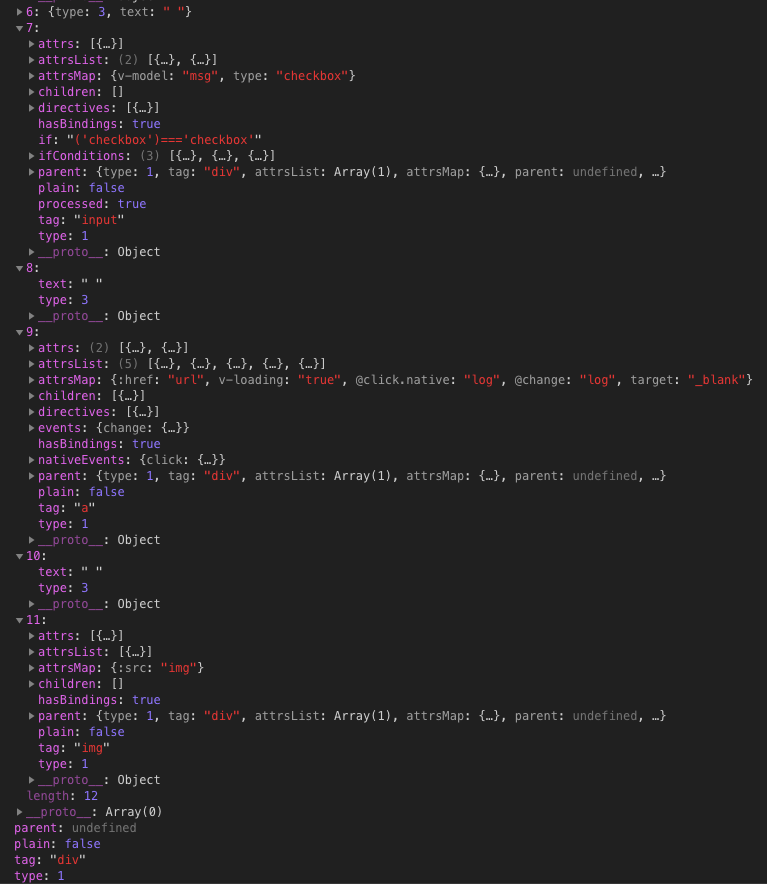
1
2
3
4
5
6
7
8
9
10
11
12
13
14
15
16
17
18
19
20
21
22
23
24
25
26
27
28
29
30
31
32
33
34
35
36
37
38
39
40
41
<div id="app">
这里是文本
<div v-for="(value,key,index) in items">{{item}}</div>

<div v-if="condition">this is v-if</div>
<div v-else-if="condition2">this is v-else-if</div>
<div v-else>this is v-else</div>

<span v-once>This will never change in v-once: {{msg}}</span>

<input :type="'checkbox'" v-model="msg" />

<a :href="url" v-loading="true" @click.native="log" @change="log" target="_blank">前面的文本{{title|upper(123,456)|sense}}后面的文本</a>
<img :src="img" />
<script>
console.log(123);
</script>
</div>

<script type="text/javascript">
var vm = new Vue({
el: '#app',
data: {
url: 'https://www.baidu.com',
title: 'liubin',
img: 'https://test.jpg',
items: [{ a: 1, b: 2, c: 3 }],
condition: false,
condition2: false,
msg: '12345',
},
filters: {
upper(value) {
return value.toUpperCase();
},
},
methods: {
log() {},
},
});
</script>

最后生成的 AST 为: