前一阵子研究了tapable的实现后,就一直在学习webpack的源码。虽然事先有预料tapable在webpack中是非常核心的存在,但过了一遍主流程后,发现比运用的想象中更普遍。可以说整个webpack就是用tapable串联起来的。这篇文章主要是记录webpack 主流程中的tapable运用,并不会涉及到非常细节的代码实现,因为我也没看完囧。
webpack中的绝大部分功能都是通过注册事件监听实现的,如果把整个打包流程看成是一辆从起点到终点运行的火车,那么每个事件就相当于一个个途中站点,事件监听函数类似于需要在对应站点下车的行人,行人就是我们的一个个Plugin,注册事件监听类似于在 A 站点上车并且想要在 B 站点下车,事件触发类似于火车到达了 B 站点,行人下车该干嘛干嘛,Plugin也就在这时开始干活。webpack中涉及的站点和行人都非常多,想要挨个弄清楚需要花费很多精力,我自己也没有怎么研究,不过了解了主流程后,就可以按兴趣针对性学习了,此时会省很多时间。
流程图
整理了一个主流程图: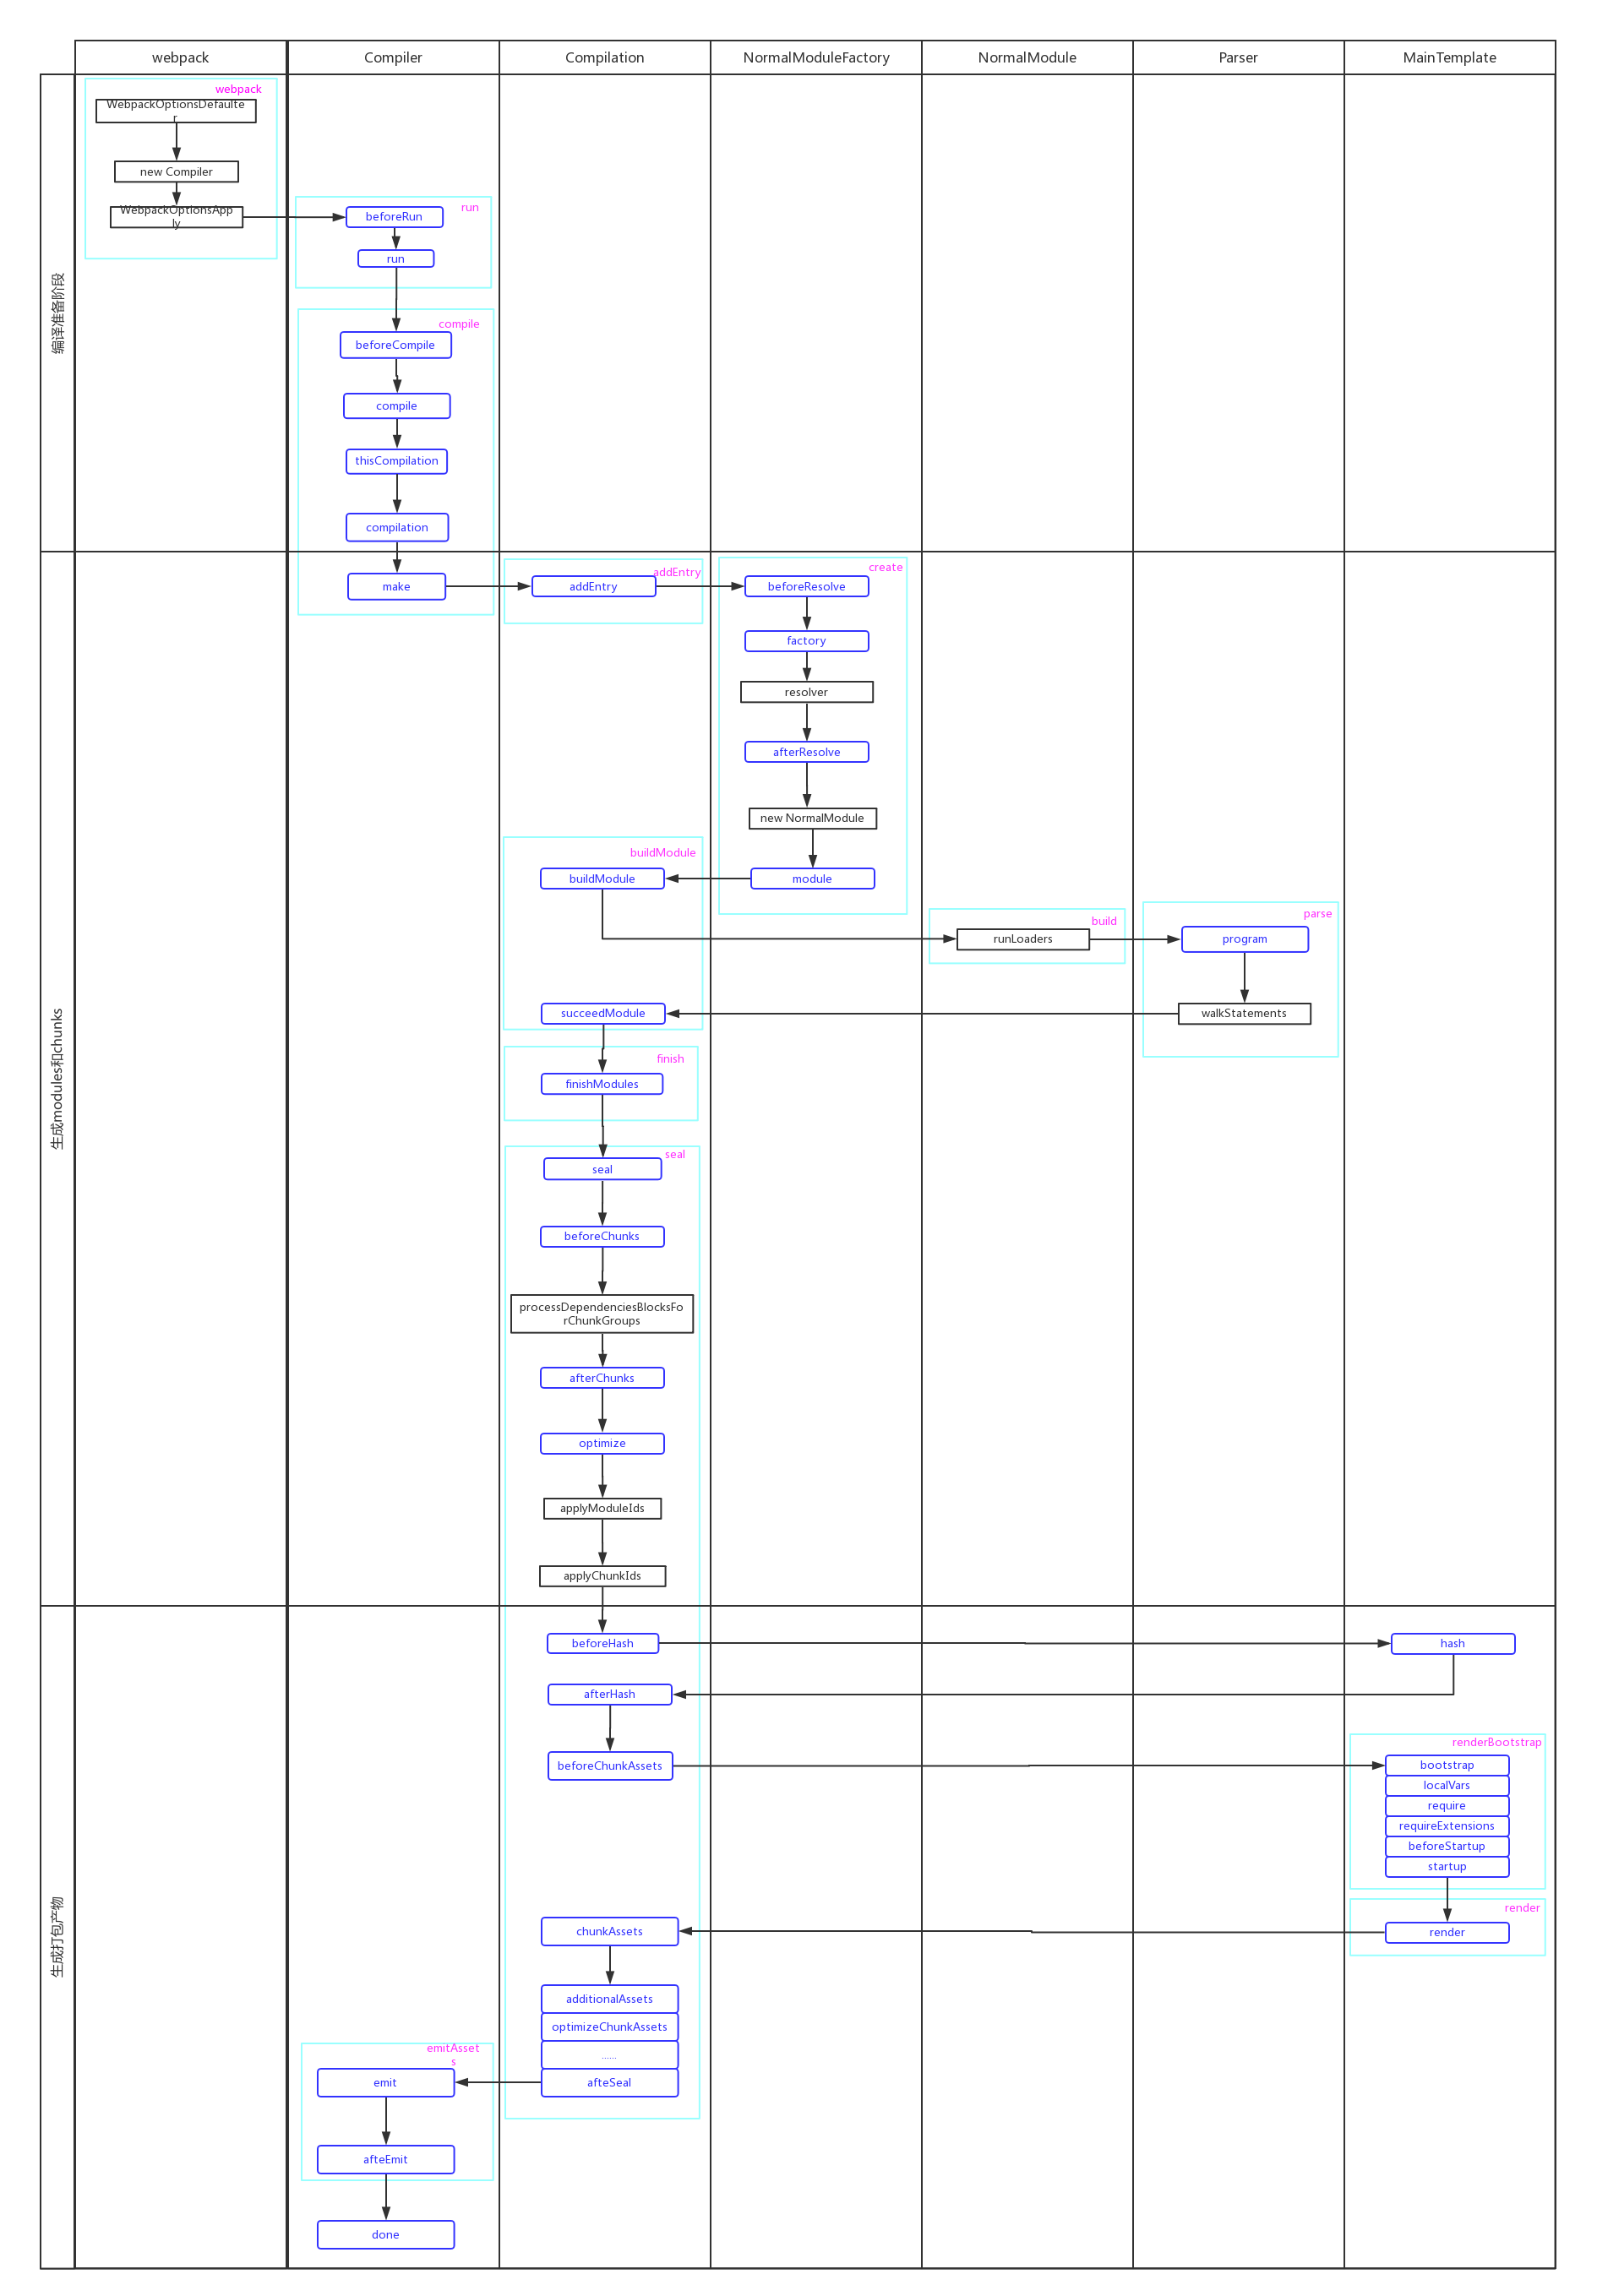
- 蓝色的节点表示触发了一个事件
- 黑色的节点表示调用了一个方法
- 竖直的泳道表示节点所属的对象或文件名
- 水平的泳道表示打包流程所属的阶段,整个过程可以分为 3 个阶段
- 编译准备阶段,主要是准备好各种配置项,初始化
Compiler和Compilation对象 - 生成
modules和chunks,可能一些人对二者的关系不是很清楚,module可以理解为一个打包产物的最小单元,比如一个js文件、一张图片;而一个chunk对应一个最终生成的文件,内部可能包含多个module;chunk与module是一对多的关系 - 生成打包产物,也就是一个个文件
- 编译准备阶段,主要是准备好各种配置项,初始化
上述只画了一部分的节点,实际上涉及到的类和节点要多得多,不过在清楚了这些后,探索其他内容时就那么迷糊了~ 以下所有的代码为了保持注意力,均会省去类似错误处理这样的旁支代码。
编译准备阶段
此阶段准备好各种配置项,初始化Compiler和Compilation对象。
首先整个打包的起点位于webpack.js中的webpack函数,以下是精简的部分:
1 | const webpack = (options, callback) => { |
WebpackOptionsDefaulter继承了OptionsDefaulter类,它的set方法用于设置每一项的默认值,比如this.set("entry", "./src")就是另entry的默认值为./src.
前半部分代码比较好懂,另外我们暂时不关注watch选项,所以接下来会调用compiler.run。在继续之前先看看WebpackOptionsApply.process:
1 | function process(options, compiler) { |
应用插件的代码比较无趣都略过了,比较关键的是EntryOptionPlugin,它监听的事件恰好就是compiler.hooks.entryOption,所以监听函数会立马得到执行:
1 | const itemToPlugin = (context, item, name) => { |
很明显,针对我们配置的entry选项来应用不同的Plugin,以单入口SingleEntryPlugin为例,另外两个类似:
1 | class SingleEntryPlugin { |
监听了两个很重要的事件钩子compilation和make,在我们的流程图里也有这两个钩子,等后续钩子触发我们再看具体的实现。
之后就是调用compiler.run:
1 | run(callback) { |
beforeRun和run两个钩子没有什么要特别注意的,最后调用了compile:
1 | compile(callback) { |
newCompilationParams会实例化两个工厂类NormalModuleFactory、ContextModuleFactory,它们的create方法会创建NormalModule、ContextModule,通过这两个Module类我们可以将每个模块结合对应的loader转化为js代码。
1 | newCompilationParams() { |
newCompilation用于创建一个Compilation对象,这个对象挂载了各种各样的构建产物,非常核心:
1 | newCompilation(params) { |
注意在这里触发了hooks.compilation,还记得之前在SingleEntryPlugin注册了这个钩子吗?
1 | compiler.hooks.compilation.tap('SingleEntryPlugin', (compilation, { normalModuleFactory }) => { |
dependencyFactories是一个Map,用于记录Dependency与ModuleFactory之间的映射,在后续hooks.make钩子中会用到。
接下来就是hooks.make钩子了,我们的编译准备工作也做完了。
生成modules和chunks
make是代码分析的核心流程,包括创建模块、构建模块的工作,而构建模块步骤又包含了:
loader来处理资源- 处理后的
js进行AST转换并分析语句 - 语句中发现的依赖关系再处理拆分成
dep,即依赖module,形成依赖网 chunks生成,找到chunk所需要包含的modules
SingleEntryPlugin也注册了make钩子:
1 | compiler.hooks.make.tapAsync('SingleEntryPlugin', (compilation, callback) => { |
很简单,看看addEntry:
1 | // 触发第一批 module 的解析,这些 module 就是 entry 中配置的模块。 |
基本上就是调用内部方法_addModuleChain,另外就是触发了 2 个钩子。
1 | function _addModuleChain(context, dependency, onModule, callback) { |
this.dependencyFactories.get(Dep)就是我们在compilation钩子中注册的那个,对于SingleEntryDependency我们拿到的是NormalModuleFactory. 看看它的create方法:
1 | // lib/NormalModuleFactory.js |
如果在beforeResolve钩子中返回false,则后续流程会被跳过,即此模块不会被打包。例如IgnorePlugin处理moment的打包问题就很典型:
测试发现import moment时会将所有locale都打包进了,追查发现在moment源码中有个函数可以执行导入,虽然默认不会执行:
1 | function loadLocale(name) { |
在webpack打包过程中,在解析完moment后发现有locale的依赖,就会去解析locale。 在IgnorePlugin中打断点发现会尝试解析 ./locale(即result.request的值):
1 | if ('resourceRegExp' in this.options && this.options.resourceRegExp && this.options.resourceRegExp.test(result.request)) { |
利用 BundleAnalyzerPlugin 可以很明显发现打包产物包含了所有 locale 文件。
解决办法,添加如下配置:
1 | new webpack.IgnorePlugin({ |
此时 IgnorePlugin会返回 null,这样我们就跳过了整个locale的打包。 (此插件注册了 NormalModuleFactory 和 ContextModuleFactory 的 beforeResolve 钩子,locale 的解析是在 ContextModuleFactory 的).
参考资料
以上就是beforeResolve的一个作用,接下来的factory钩子的监听函数中会生成NormalModule实例:
1 | this.hooks.factory.tap('NormalModuleFactory', () => (result, callback) => { |
传入new NormalModule的参数对象类型示范,这些数据是在resolver监听中生成的:
1 | result = { |
生成了NormalModule后会回到Compilation.prototype._addModuleChain,并在随后调用buildModule方法并传入新创建的NormalModule:
1 | buildModule(module, optional, origin, dependencies, thisCallback) { |
核心还是NormalModule.prototype.build:
1 | build(options, compilation, resolver, fs, callback) { |
内部使用了runLoaders这个库来转化module,如何确定每个Module对应的loaders呢?在初始化NormalModuleFactory时会解析options.rules得到一个ruleSet属性。 ruleSet会去匹配文件类型并结合rules找到需要的loaders。
1 | // lib/NormalModuleFactory.js |
RuleSet的解析过程比较复杂,主要是因为rules配置很灵活,还要兼容一些过时的配置方式,具体过程大家自行了解。
runLoaders在内部主要是读取module内容,再迭代loaders的处理方法,关键的代码有:
1 | // loader-runner/lib/LoaderRunner.js |
注释中也有写到,一个loader其实就是一个函数:(source: string, inputSourceMap) => string,比如babel-loader:
1 | function (source, inputSourceMap) { |
doBuild方法结束后会拿到module转化后的js代码,并在接下来使用Parser.prototype.parse方法将js转为AST。
1 | parse(source, initialState) { |
Parser.parse中是利用acorn这个第三方库来生成AST的,类似的还有esprima。
一个Module可能依赖其他Module,这需要逐个解析AST节点来确定,由于依赖的方式有很多种比如require、require.ensure、import等,对于每一种依赖都有对应的类例如AMDRequireDependency,依赖的形式如此之多以至于webpack专门建了一个lib/dependencies文件夹。
当
parser解析完成之后,module的解析过程就完成了。每个module解析完成之后,都会触发Compilation实例对象的任务点succeedModule,我们可以在这个任务点获取到刚解析完的module对象。正如前面所说,module接下来还要继续递归解析它的依赖模块,最终我们会得到项目所依赖的所有modules。此时任务点make结束。注意require.ensure在build后被放入了module.blocks而不是module.dependencies。
接下来按照流程图我们会调用Compilation对象的finish和seal方法。finish很简单就触发了一个钩子,我们的重点放在seal上:
1 | seal(callback) { |
到了seal方法,我们已经处理了所有Module并统一打平放到了compilation.modules中,现在需要根据modules生成chunks,代码中放了一些大致流程的注释,内部的实现还是很复杂的。
moduleId和chunkId作用: 在filename的变换时会用到[id]/[moduleid]; chunhHash会用到chunk id; 生成的打包代码会将名称替换为id;
createHash的会生成hash、moduleHash、chunkHash,hash生成算法核心是crypto.createHash + ‘md4’。在随后的createChunkAssets -> TemplatedPathPlugin中替换filename、chunkfileName的[hash]、[chunkhash].
modules生成chunks
没有看完,这里记录掌握的东西。涉及到 3 个核心对象:
ChunkGroup: 内部维护了chunks、children、parents3 个数组,并添加了一系列方法来维护这 3 个数组。chunks表示这个group下面拥有多少chunk;Chunk:内部维护了groups、modules数组。groups表示此chunk存在于哪些chunkgroup中;modules表示此chunk内部含有多少moduleModule:内部维护了chunks数组。chunks表示此module存在于哪些chunks当中。
assignDepth方法:从 entry 出发,为每个 module 添加一个 depth 属性
entry的depth为 0- 依赖的静态模块
depth+1 - 动态模块的
depth也是 +1 - 层级遍历
一些参考文档:
生成了chunks之后,第二阶段就完成了,接下来就是生成打包产物阶段了。
生成打包产物
根据 chunks 生成最终文件,主要有三个步骤:
- 模板
hash - 更新模板渲染
chunk - 生成文件
Compilation在实例化的时候,就会同时实例化三个对象:MainTemplate、ChunkTemplate、ModuleTemplate。这三个对象是用来渲染chunk对象,得到最终代码的模板。第一个对应了在entry配置的入口chunk的渲染模板,第二个是动态引入的非入口chunk的渲染模板,最后是chunk中的module的渲染模板。
上面seal方法中调用的createHash就是用于生成模板hash的,hash包含两种:
- 本次构建的整体
hash,用于替换output选项中的[hash],如[name].[hash].js - 每个
chunk也会生成一个基于内容的hash,用于替换output选项中的[chunkhash],如[name].[chunkhash].js
createHash的主要代码如下:
1 | createHash() { |
hash生成后接下来就会利用createChunkAssets方法生成每个chunk的代码。
首先判断是否为entry来选择Template:
1 | // createChunkAssets() |
然后生成文件名:
1 | // 根据配置中的 output.filename 来生成文件名称 |
最后根据模板来拼接文件内容:
1 | const manifest = template.getRenderManifest({ |
render方法其实是在chunk内容前后添加各种样板代码,例如MainTemplate:
1 | render(hash, chunk, moduleTemplate, dependencyTemplates) { |
bootstrap钩子在多个插件中有注册,例如JsonpMainTemplatePlugin中的部分示例:
1 | mainTemplate.hooks.bootstrap.tap('JsonpMainTemplatePlugin', (source, chunk, hash) => { |
每个chunk的代码生成后就会放到compilation.assets数组中。
生成代码后只剩最后将其输出到文件中了,这一步是在Compiler.prototype.emitAssets函数中:
1 | const targetPath = this.outputFileSystem.join(outputPath, targetFile); |
以上就是webpack的主体流程了~
参考文章
- 玩转 webpack
- webpack 源码学习系列](webpack 各个击破)
- webpack 各个击破
- diving-into-webpack
- webpack 源码分析